
 18 september 2026, 22:12
Most email tutorials start with how to set up SMTP or which library to install. But few explain the real challenges — why your emails might still land in spam, what breaks at scale, or how APIs outperform traditional setups in real-world apps. If you’ve ever had an email silently fail, or watched a bulk send crawl because of SMTP rate limits, you already know the pain. Here, we’ll walk through practical ways to send emails from Node.js — from small transactional messages to high-volume, personalized delivery using both SMTP and modern APIs.
Node.js itself has no built-in mail transport, so every approach below either speaks SMTP through a library or sends an HTTP request to a provider’s API. If you’re building on a different stack, the same two options apply — see our guides for sending email with PHP, sending email with Python, sending email with Go, or our broader roundup of every way to send email from JavaScript if Node isn’t the only place your app sends mail from.
Overview of Email Sending Methods in Node.js
There are two main ways to send email with Node.js: using SMTP or using an Email API. SMTP is a well-supported and reliable method, but it can be harder to scale up. If you want to send thousands of emails at once, or if you need delivery tracking and analytics, using SMTP alone might not be enough.
It’s worth naming a third option so you don’t reach for it by mistake if you’re skimming comparisons: EmailJS runs primarily in the browser and connects to your own mailbox account, which suits contact forms on static sites. It isn’t built for server-side transactional volume and its free tier caps monthly sends, so it doesn’t really compete with SMTP or an API for the use cases this guide covers, but it explains why you’ll see it mentioned alongside them elsewhere.
SMTP vs Email API: What’s the Difference?
When you send an email using SMTP, your Node.js app connects to a designated SMTP server and gives it the email details (like who it’s from, who it’s to, the subject, and the body). The server then transfers the message to the recipient’s email server. The SMTP protocol is robust, time-tested and easy to troubleshoot.
To send email using Node.js and SMTP, you use a library like Nodemailer. You also need access to a working SMTP server — this can either be an external SMTP server provided by UniOne, Gmail, Outlook, etc., or your own. If you ever need to change providers, you’ll only need to swap the credentials.
Email APIs are modern alternatives to SMTP. Instead of connecting to a mail server, your app sends a POST request to an HTTP API endpoint, with all the email information in JSON format. The email service provider receives this request and handles delivery.
Many services, including UniOne, offer email APIs that are easy to use, outperform SMTP in speed, and offer extra features like real-time status tracking, bulk email support, template management, and error logging. However, unlike SMTP, email APIs are not standardized, so you cannot easily migrate from one API to another.
Below’s a short comparison of both methods:
|
Feature |
SMTP |
Email API |
|
Protocol |
SMTP (port 587, 465, or 25) |
HTTPS |
|
Setup Complexity |
Easy |
Medium |
|
Speed |
Slower |
Faster |
|
Delivery Tracking |
Not built-in |
Built-in |
|
Scalability |
Limited |
High |
|
Supported by UniOne |
Yes (SMTP Service) |
|
|
Best For |
Simple apps, legacy systems |
Modern apps, large volumes, automation |
Choosing the Right Method for Your Node.js Application
The best method depends on what your app needs. Here are key questions to ask yourself:
- Do you need fast delivery and tracking? If yes, go with an Email API. APIs give you fast delivery and real-time status updates.
- Do you already use SMTP in your system? If yes, and you don’t need extra features, you can stick with SMTP. It’s reliable and well-supported in Node.js.
- Will you send a lot of emails? If yes, Email APIs are the way to go. They are built for bulk email and handle throttling, retries, and analytics.
- Do you want to send personalized emails with templates? Both methods are fine, but APIs usually offer more advanced tools for managing and reusing templates.
- Are you sending transactional or marketing emails? For transactional messages (password reset, order confirmation), either method works. For marketing campaigns or bulk emails, APIs are safer and easier to manage — and worth pairing with email validation before a large send.
In most modern projects, email APIs are the preferred choice because they are faster, more reliable, and provide more control over delivery.
Basic Requirements Before You Start
Before you can send email, your project must be correctly configured. Make sure you have:
|
A verified sender email address |
You need an email that is allowed to send messages. Most services won’t deliver emails from fake or unverified addresses. |
|
Domain authentication (DKIM, SPF, DMARC) |
To prevent your emails from being marked as spam, your sending domain must be authenticated. Most providers (like UniOne) provide DNS setup instructions. |
|
A Node.js project |
Your app must be set up with npm or yarn. If not, run npm init -y to create a project. |
|
A mail service provider account |
You need access to either: • an SMTP server (like the one UniOne offers), or • an email API service (like UniOne’s API platform). |
|
Your credentials |
You must have either: • SMTP username and password, • or API user id and key/token for authentication. |
|
A tested internet connection |
Without stable network access, delivery can fail or hang. |
|
Installed dependencies |
• For SMTP: install Nodemailer • For API: install the axios package or use built-in https module. |
|
Basic knowledge of async code |
Sending emails is an asynchronous task. You must use async/await or .then() to handle results and errors properly. |
How to Send Email Using SMTP in Node.js
Setting Up Nodemailer
Nodemailer is a Node.js library that allows you to send emails using SMTP. It’s the most popular tool for this purpose, with all standard features needed for transactional or notification email.
Install it in your project:
|
npm install nodemailer dotenv |
Import it with CommonJS or ES modules, depending on your project:
|
const nodemailer = require(‘nodemailer’); |
Nodemailer works by creating a transporter. This transporter is an object that knows how to connect to the SMTP server and send emails.
You must configure this transporter with the SMTP host name or IP, port number and authentication credentials (username and password). A basic configuration looks like this:
|
const transporter = nodemailer.createTransport({ host: ‘smtp.example.com’, port: 587, secure: false, // true for port 465, false for 587 auth: { user: ‘your_username’, pass: ‘your_password’ } }); |
Four fields carry all the weight here. host is your provider’s SMTP server; port is 587 for STARTTLS, 465 for implicit TLS, and 25 for server-to-server relay that most cloud platforms block outright. secure describes the port you chose rather than whether the connection is encrypted — on 587, TLS is negotiated after the initial handshake, so false is correct. The auth object holds credentials that belong in environment variables, never in the file you commit.
Connecting to an SMTP Server
To send emails using SMTP, you must connect to an actual SMTP server — either provided by an external service (such as UniOne) or hosted by you. For details on setting up your account, visit UniOne’s SMTP Service page.
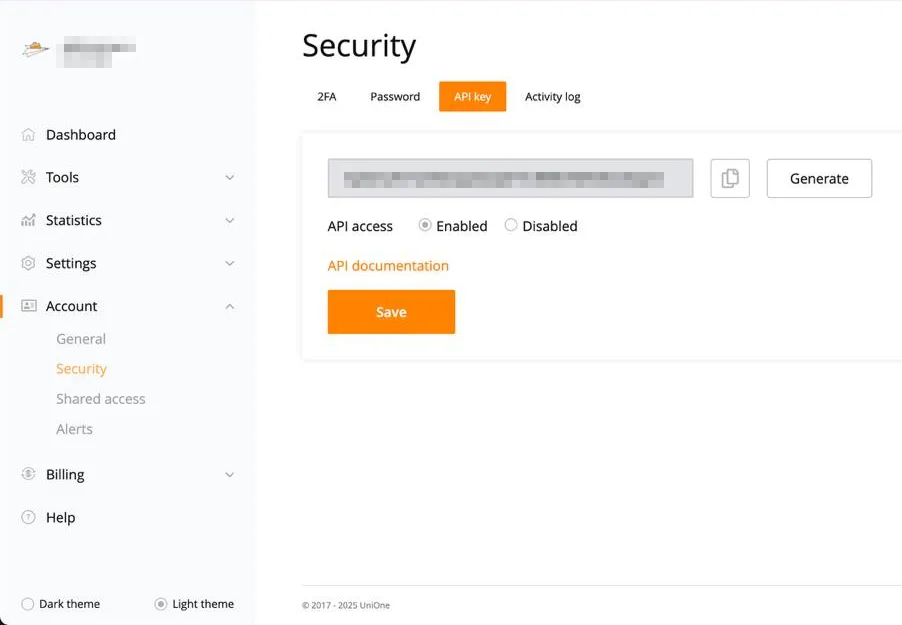
For authorization, you need your user ID and API key (which serves as the password for the SMTP connection):
- Sign in to your UniOne account.
- Go to the Account – Security section.
- Create a new token or copy an existing one.
- Store it in .env as SMTP_PASSWORD and add .env to .gitignore.
Example setup using UniOne:
|
const transporter = nodemailer.createTransport({ host: ‘smtp.unione.io’, port: 587, secure: false, auth: { user: ‘your_unione_user_id’, pass: ‘your_unione_api_key’’ } }); |
Make sure to use your real UniOne credentials. You can find this information in your UniOne dashboard after registering.
To verify the connection before sending an email, you can run:
|
transporter.verify(function(error, success) { if (error) { console.error(‘SMTP connection failed:’, error); } else { console.log(‘SMTP server is ready to take messages’); } }); |
This helps check your credentials and connection settings before you start sending emails.
Sending a Plain Text Email
The simplest way to send an email is using plain text. This is useful for alerts, system logs, or other text-only messages.
Here is how to send a plain text message using Nodemailer:
|
const mailOptions = { from: ‘”Your App” <[email protected]>’, to: ‘[email protected]’, subject: ‘Test Email’, text: ‘Hello! This is a plain text email sent from Node.js using Nodemailer.’ }; transporter.sendMail(mailOptions, function(error, info) { if (error) { return console.error(‘Error while sending:’, error); } console.log(‘Message sent: %s’, info.messageId); }); |
Where:
- from is your verified sender address;
- to is the recipient email;
- subject is the email subject line;
- text is the plaintext message body.
This method sends a basic message without any visual styling.
Sending an HTML Email
HTML emails allow you to use rich formatting, colors, links, and images. This is useful for newsletters, confirmations, or branded communication.
To send HTML content, replace the text field with an html field:
|
const mailOptions = { from: ‘”Your App” <[email protected]>’, to: ‘[email protected]’, subject: ‘Welcome!’, html: ‘<h1>Welcome to Our App</h1><p>We are glad to have you onboard.</p>’ }; transporter.sendMail(mailOptions, function(error, info) { if (error) { return console.error(‘Failed to send HTML email:’, error); } console.log(‘HTML message sent:’, info.messageId); }); |
Keep the CSS inline. Mail clients strip <style> blocks unpredictably and ignore external stylesheets completely, and Outlook still renders through a layout engine that predates flexbox, so tables remain the safe structure for anything multi-column. For dynamic content, a small function that returns a string is often enough, or you can store templates in your provider’s dashboard and reference them by ID — see working with templates below.
Sending Email with Attachments
You can send files such as PDFs, images, or CSVs as email attachments. Nodemailer supports this using the attachments property:
|
const mailOptions = { from: ‘”Reports” <[email protected]>’, to: ‘[email protected]’, subject: ‘Monthly Report’, text: ‘Please find the attached report.’, attachments: [ { filename: ‘report.pdf’, path: ‘/path/to/report.pdf’ } ] }; transporter.sendMail(mailOptions, function(error, info) { if (error) { return console.error(‘Sending with attachment failed:’, error); } console.log(‘Email with attachment sent:’, info.messageId); }); |
You can also attach files from a URL or use base64-encoded content:
|
attachments: [ { filename: ‘image.jpg’, content: new Buffer(base64string, ‘base64’), contentType: ‘image/jpeg’ } ] |
Watch the size. Base64 encoding inflates a file by roughly a third, most mailbox providers reject messages over 10–25 MB, and a heavy attachment slows every send in a batch. For anything large, upload to storage and email the link instead.
Handling Errors and Failures
When sending emails with SMTP, errors can happen for many reasons, like wrong login credentials, incorrect host/port, blocked connections, invalid recipient addresses, blacklisted IP, or temporary server issues.
You must handle these errors clearly and log them. Nodemailer provides a callback with error and info parameters.
|
transporter.sendMail(mailOptions, function(error, info) { if (error) { console.error(‘Send failed:’, error.message); // Optional: retry logic or alert system } else { console.log(‘Email sent:’, info.response); } }); |
You can always use try/catch when using async/await:
|
try { const info = await transporter.sendMail(mailOptions); console.log(‘Email sent:’, info.messageId); } catch (error) { console.error(‘Send failed:’, error.message); } |
Log the full error stack in development, but avoid printing it in production logs to prevent exposing sensitive data. You can also monitor the SMTP server status using transporter.verify() before sending to eliminate silent failures due to incorrect configurations.
How to Send Email with Email API in Node.js
Using an Email API can save time, improve deliverability, and give you more control over your sending process.
When to Use HTTP Email APIs
HTTP Email APIs let you send emails by calling an external service over HTTPS, with no need to manage an SMTP connection manually. Your Node.js app sends an HTTP POST request with the email content, and the service handles delivery.
You should use an Email API if:
- You need to send many emails quickly
- You want real-time delivery tracking
- You want to reduce server configuration work
- You need features like tags, templates, and analytics
Firewalls that block outbound port 587 rarely block 443, which is another reason serverless projects lean this way — see the Email API service for developers for the full feature list.
Preparing Your UniOne API Token
Getting a key takes four steps:
- Sign in to your account and open Account → Security.
- Create a new API key or copy an existing one.
- Store it in .env as UNIONE_API_KEY and add .env to .gitignore.
- Restart your process so dotenv picks up the new value.
Never expose your key in the browser or share it publicly — it gives full access to your email-sending features.
Sending Email via UniOne API
Node.js 18+ ships with a global fetch, so no HTTP client is required. UniOne’s request body takes recipients as a recipients array on the message object, and the endpoint path follows the /en/transactional/api/v1/email/send.json format documented in the UniOne API reference:
Install axios:
|
npm install axios |
Send a basic message:
|
require(‘dotenv’).config(); const API_URL = ‘https://eu1.unione.io/en/transactional/api/v1/email/send.json’; async function sendViaApi() { const payload = { message: { from_email: ‘[email protected]’, from_name: ‘Acme App’, subject: ‘Your password reset link’, recipients: [{ email: ‘[email protected]’ }], body: { html: ‘<p>Reset your password <a href=”https://acme.dev/r/xyz”>here</a>.</p>’, plaintext: ‘Reset your password: Use eu1.unione.io or us1.unione.io for the region your account was registered at, or api.unione.io if you’d rather not think about region at all — all three resolve to the same API. A successful call returns a status of success plus a job_id you can use to trace the message in your logs and analytics. Failures come back with an HTTP code that tells you what to do next: 400 means the payload is malformed, 401 means the key is wrong or missing, 403 usually points at an unverified sending domain, and 429 means you’ve hit a rate limit. Retry on 429 and 5xx with exponential backoff; fix the request for anything in the 400 range, because repeating it changes nothing. Sending Emails with Dynamic Content or TemplatesUniOne supports dynamic templates for sending many similar emails with small personalized changes, like names or order IDs. In your template, use placeholders such as {{name}} or {{order_id}}. To use a template: create and save it in your UniOne dashboard, get the template ID, then pass template_id and per-recipient substitutions in your API request:
Working with UniOne’s API, you have access to two template engines — Simple and Velocity, the latter offering more advanced logic. Marketing and design can then update copy without a deploy, and your codebase stays free of HTML. You can browse and reuse saved designs from your transactional email templates library. Attaching Files and Images via APIThrough the API, attachments travel as base64 and inline images sit in a separate field:
We don’t recommend attaching large files — this slows sending, and most services limit total message size anyway. Instead, use links to cloud storage when needed. UniOne also supports inline images using inline_attachments, referenced in the HTML body by content ID. Handling API Errors and Response CodesWhen using the API, you must handle errors correctly. These are the common reasons to failure:
UniOne returns error details in the response. You should always check the response status code and body:
Response status codes to expect are:
You can retry temporary errors after a short delay. For permanent errors, first fix the request structure or data. Sending Email to Multiple Recipients and PersonalizationUsing ‘To’, ‘CC’, ‘BCC’ in Node.jsFor each email, you can specify one or more recipients. In Node.js, when sending emails with SMTP (using Nodemailer) or with an email API (like UniOne), you can use the following header fields:
Each field can contain either a single email or a list of emails. Example using Nodemailer:
With UniOne’s API, to, cc, and bcc live inside the message object as arrays of { email } objects. Always validate addresses before sending — run your list through email validation first — and be careful not to mix up to, cc, and bcc, especially in automated systems. Personalizing Messages with VariablesPersonalization means making each email more relevant by changing its content for each recipient. A common use case is to insert a person’s name or order number into the message. There are two ways to personalize messages:
You can generate each message for every recipient:
You can send one request with substitutions for each recipient:
Each recipient gets a message with different values inserted. This is much faster than generating every email separately in your node.js code and helps keep your email-sending system efficient. Make sure all variables used in the body match the keys in the substitutions object. Bulk Email Sending with Node.jsWhen using SMTP to send many emails, you should not try to send all messages at once. SMTP servers usually have rate limits. If you send too many messages too fast, the server can block your IP or delay delivery. Sending in Batches with NodemailerA safer approach is to send emails in batches. This means sending a few messages at a time, with small delays between them. Example batch sending logic:
This method works well for most transactional or alerting emails. It’s one of the easiest ways to send email node.js developers often start with. For higher volumes, consider using a message queue system like RabbitMQ, Bull, or AWS SQS to schedule and control delivery. Using UniOne API for Bulk MessagingUniOne provides full support for sending emails to multiple recipients in one API request. This is the best method for bulk delivery, especially when you personalize messages. The to field in UniOne’s API accepts an array of recipients. You can include up to 1000 recipients in one call, depending on your plan. Each recipient can have its own substitution values. This allows you to send personalized emails without making separate API calls. Example:
Send the request once, and each user gets a unique email. This approach reduces API calls, speeds up delivery, and supports per-user personalization. You can read more on UniOne’s email API service for developers documentation pages. For very large campaigns, UniOne supports asynchronous sending with job tracking, so you don’t need to manage retries manually. Throttling and Queue ManagementWhen sending a large number of emails, it is important to control the rate of sending. This is called throttling. It prevents overloading your provider and helps avoid getting blocked by spam filters. Throttling is a control mechanism that helps your email system avoid being blocked or slowed down by the server. In practice, it means you don’t send too many emails in a short period of time. Instead, you send them gradually – spreading requests over time. This can include adding pauses between individual messages or batches and retrying later when the server is under heavy load. This matters because most SMTP servers enforce limits. For example, they may allow only 100 emails every 10 minutes. If you exceed this rate, the server may start rejecting your requests. With API-based sending, the same issue can appear in the form of a 429 Too Many Requests error. This response means that your app sent more requests than the system allows in a given time frame. Advice:
Queue with rate limit:
Each job in the queue would send one email. Bull manages spacing and retries for you, and logging gives you full visibility into your node.js send email operations. Working with Email Templates in Node.jsUsing templates is a common method to generate dynamic email content. Templates let you define a fixed structure and insert custom values inside. This is useful for messages like order confirmations, password resets, and newsletters.
Working with UniOne API, you also have access to two template engines, Simple and Velocity. The latter requires a bit more coding but offers advanced features.
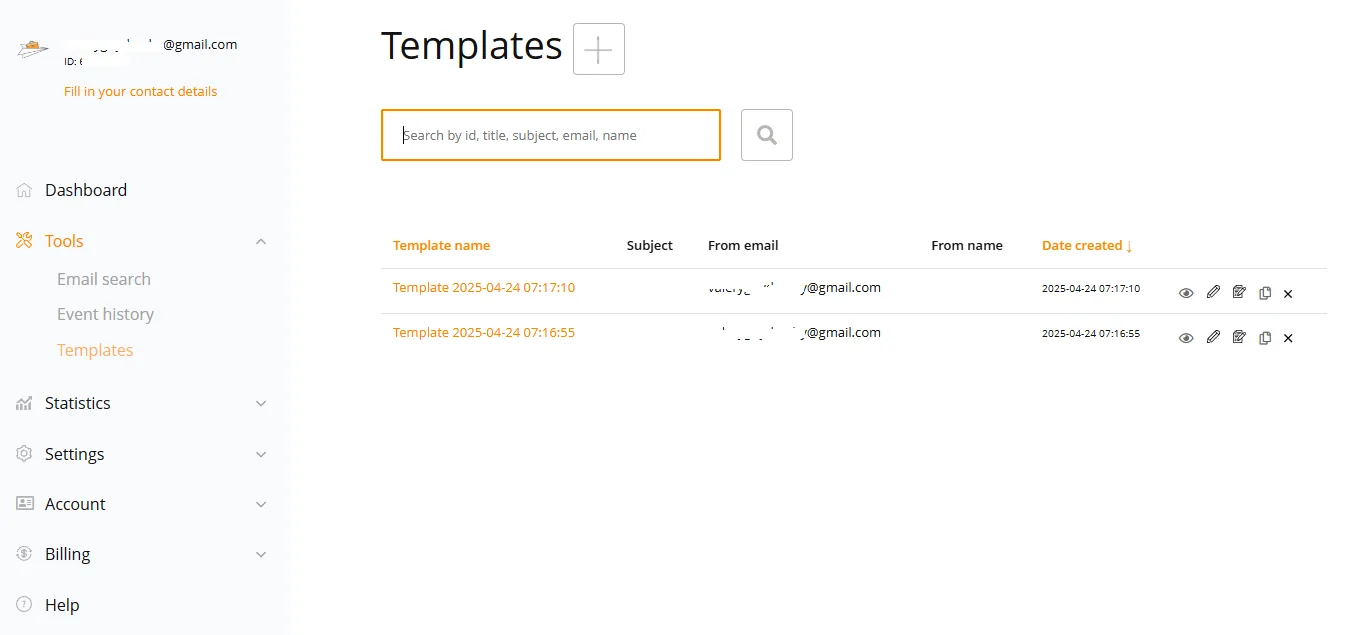
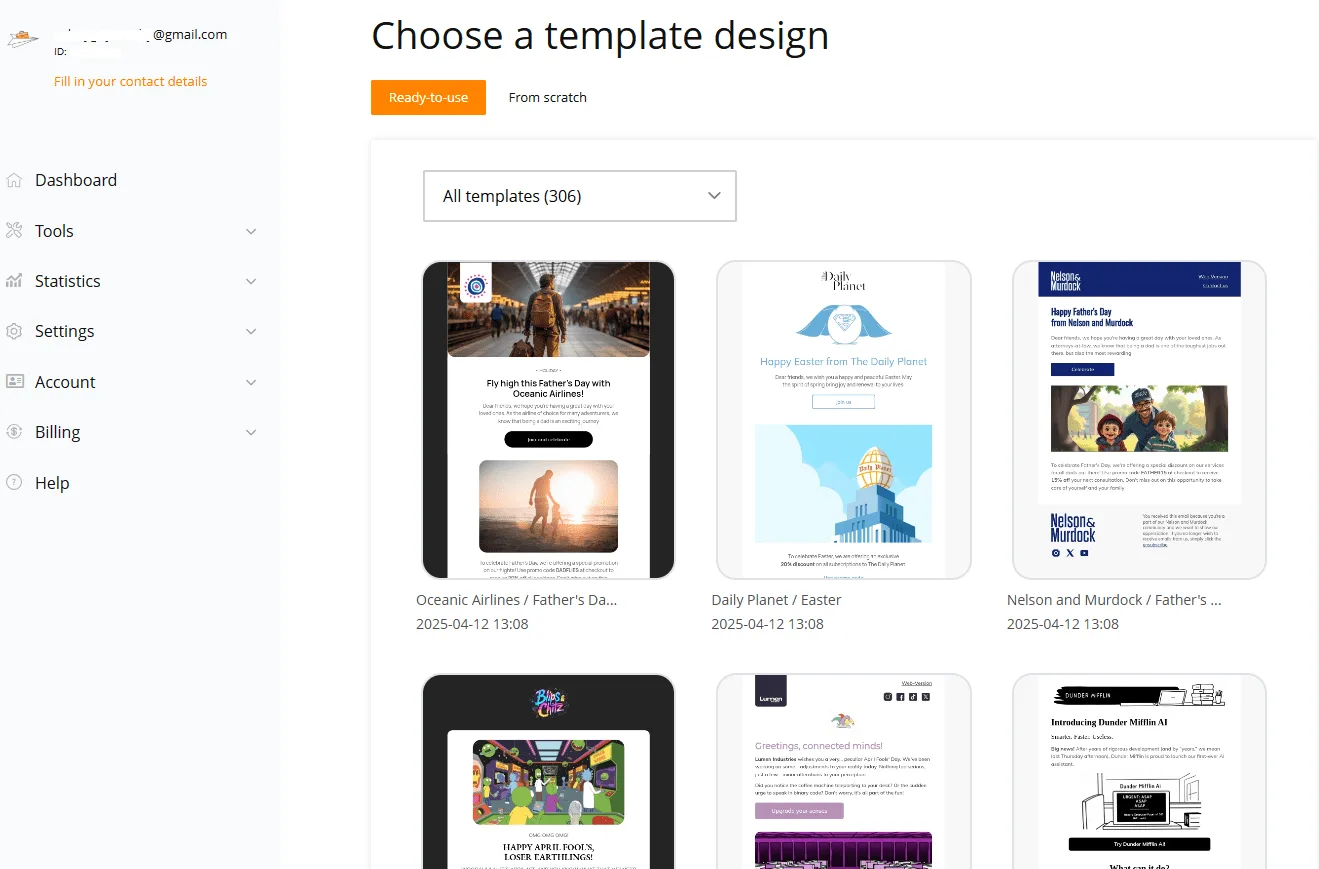
In Node.js, the two most common template engines are Handlebars and EJS. You may want to use those with SMTP mailing or implement complex logic not supported by Velocity. Storing and Reusing TemplatesIn UniOne, you can upload templates via the dashboard and reference them using template_id in the API request. You can browse and preview from a library of saved email templates. Each design can be used in API-based campaigns by referencing its template ID. Each template shows its creation time, associated sender, and quick actions to edit, preview, or duplicate it for use in future campaigns. Inline CSS Styling and Responsive LayoutsMost email clients have poor support for modern CSS. To make sure your emails look correct, you need to:
Example:
Testing Email Functionality Before DeploymentBefore you send real emails to users, you should test your email-sending code in a local environment. This helps you verify that the message structure is correct, variables are inserted properly, and no sensitive or broken content is included. To test email sending without sending real emails, use MailDev or MailHog. These tools act like fake SMTP servers. Your app sends emails to them, and they show the result in a web browser. MailDevMailDev is a Node.js-based tool for local email testing. Installation:
Start MailDev:
This starts:
Set up your transporter in Nodemailer:
Now every email you send will appear in the MailDev browser window. MailHogMailHog is another tool with similar features. It is not written in Node.js but works cross-platform. Installation (via Docker):
Web UI: http://localhost:8025 Nodemailer setup:
MailHog captures the messages and shows both raw and rendered versions. It also supports message history and SMTP logs.These tools are very helpful for early-stage testing. They help you confirm the subject, body, headers, and formatting of your messages before touching a real inbox. Using UniOne’s Email Testing EnvironmentWhen you are ready to test email delivery with real infrastructure, but without sending messages to real people, use UniOne’s Email Testing service. UniOne allows you to:
How to use it:
Using UniOne’s testing environment allows you to review how your email will behave before it reaches a real user. It shows exactly how dynamic content is rendered, so you can confirm that all placeholders – such as names, dates, or order numbers – are being replaced correctly. This is especially useful when you use templates with substitution variables. It also lets you verify whether attachments are included in the message and delivered in the proper format. Sometimes, emails may be sent without the intended file or with a damaged attachment, and this tool helps you detect that before anything goes live. Another important benefit is checking your headers. These include fields like Reply-To, List-Unsubscribe, and others that play a key role in deliverability and compliance. If any of them are missing or incorrectly formatted, the test result will help you spot the problem. You can also preview how your email looks in HTML form, which is critical for appearance across different email clients. Some email platforms handle formatting differently, and what looks good in one inbox may break in another. The testing system gives you a safe space to catch those layout issues early. Debugging and Inspecting Email PayloadsWhen something goes wrong in email delivery, you need to inspect:
With SMTP (e.g., Nodemailer) Use transporter.sendMail() and check both error and info:
If an error happens, check:
Use transporter.verify() before sending to check your setup. With UniOne API Check the API response code and body. Example using axios:
The response will include:
When using the UniOne API, it’s important to carefully check the response from the server after each request. This will tell you if the message was accepted or if something went wrong. If your request was successful, the API will return a 200 OK status along with a confirmation in the response body. But if something is wrong with your payload, you’ll get an error response – such as 400 Bad Request if the structure is invalid, or 401 Unauthorized if your API token is missing or incorrect. The error message will often include a clear explanation, like “Invalid recipient email” or a notice about a missing field. To avoid these problems, always review your request payload before sending it. Make sure that all required fields are included. This means you must have at least a to address, a subject, and a valid body in either plain text, HTML, or both. These are minimum requirements. If any of them are missing, the API will reject the request. Also, check that your dynamic variables are formatted and passed correctly. For example, if you use a template with {{name}} in the body but forget to provide a value for {{name}} in the substitution list, your message will either fail or be delivered with the placeholder still visible to the user. If you’re attaching files, confirm that the content-type for each attachment is valid. This means using values like application/pdf for PDF files or image/png for PNG images. A wrong or missing type can break the attachment or make the message fail altogether. Inspect your optional fields like reply_to and cc. If these fields are included in the payload but not properly formatted – for example, missing email addresses or containing invalid characters – the API may reject the whole message. Even if these fields are optional, they must still follow correct syntax when used. How to Handle Errors in Email-Sending CodeWhen using SMTP to send emails (e.g. with Nodemailer), you may receive errors from the SMTP server. These errors are identified by response codes. Each code gives a specific meaning. Basic SMTP response codes are three-digit numbers. The first digit shows the result:
Common SMTP codes are:
Note, however, that the text descriptions following the digital error code are not standardized, and should not be relied upon for error processing. When using Nodemailer, the error object returned in sendMail() will include:
Example:
You can use the code to decide whether to retry, to alert the user, or whether to skip the recipient. We recommend avoiding retrying if the code starts with 5. API Error Responses and RetriesWhen using UniOne or any email API, you must check the HTTP response to understand if the request succeeded or failed. Most APIs follow standard HTTP status codes. Common HTTP status codes in email APIs:
When using the UniOne API or any other email API, it’s critical to understand how to respond to different types of HTTP errors. Not all failures should be handled the same way. Some require retrying the request after a short delay, while others signal a permanent issue that must be fixed in the code or payload before trying again. You should only retry a request if the problem is temporary. This includes responses like 429 Too Many Requests, which means you’ve hit the rate limit and need to wait before sending more. It also includes 500 Internal Server Error and similar codes like 502 Bad Gateway, 503 Service Unavailable, or 504 Gateway Timeout. These errors usually mean the server is overloaded or facing internal issues and might recover soon. To retry correctly, you must not send the same request immediately. Instead, apply exponential backoff. This means you wait a bit longer after each failed attempt – first one second, then two seconds, then four, and so on. This gives the server time to recover and lowers the chance of repeated failures. However, you must never retry if the error is permanent. For example, a 400 Bad Request means your JSON or parameters are wrong. Fix the request before trying again. A 401 Unauthorized or 403 Forbidden means your API token is missing or not allowed to perform that action. A 404 Not Found means the endpoint you’re calling doesn’t exist. Retrying these errors won’t help and will only waste resources or make the problem worse. Example retry handler:
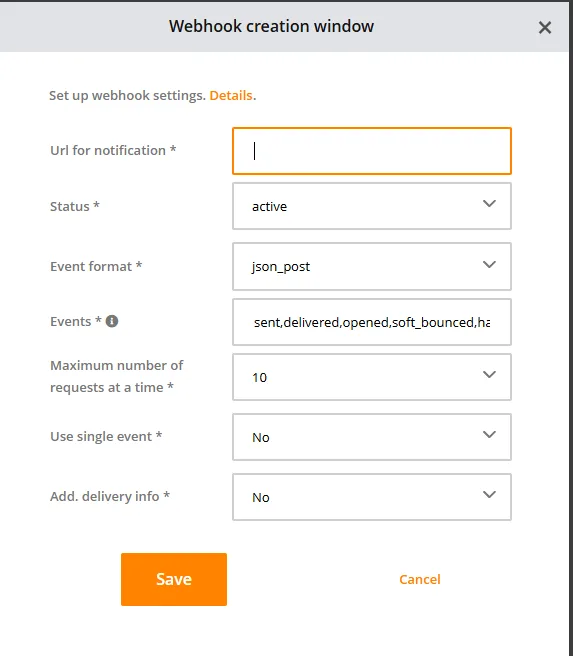
Logging and MonitoringFor each email you send, your system should write a log entry that includes several important pieces of information. You need to record the exact time the email was sent, so you can match it to events in other systems if needed. The message ID, typically returned by the SMTP server or email API, helps you track the message through delivery pipelines. You should also log the recipient’s email address and optionally the subject line, so it’s easier to identify the message in logs or support requests. More importantly, every log entry should include the delivery status. If the email was accepted, note that it was successful. If it failed, capture the reason. This means storing the full response returned by the SMTP server or the email API, including any error codes or human-readable messages. If your system retries failed sends, also track how many times each message was retried and whether the retry was successful. Logging this data consistently allows you to see patterns, such as repeated failures to a specific domain, or sudden increases in bounces. It also helps you catch silent failures where messages don’t arrive but no obvious error was raised. With proper logging, you don’t have to guess what happened – you can go back, check the record, and take action based on facts. UniOne’s webhook configuration window lets you track key delivery events like sent, opened, bounced, or clicked in real-time. ConclusionSending email with Node.js reliably and at scale requires understanding the tools involved. SMTP remains stable and well-supported, especially if you already have a working mail server or need tight control over delivery configuration. Email APIs — like the one offered by UniOne — have become the more efficient choice for most modern applications, providing faster delivery, easier personalization, built-in analytics, and better support for bulk sending. Whatever you choose, what matters is how you build around it: handling errors properly, setting up retries with care, protecting your domain reputation with SPF, DKIM, and DMARC, and testing every message before it reaches your users. UniOne Services Than Can HelpSMTP ServiceUniOne provides a secure, reliable SMTP service that works with any email client or backend, supporting authentication, encryption (TLS/SSL), and Nodemailer out of the box. Good if you already use SMTP, want simple configuration, or need to switch from another SMTP provider. You’ll need your UniOne user ID and API key, the host smtp.unione.io, and port 587 (STARTTLS). UniOne also provides bounce handling, SPF/DKIM/DMARC authentication, and sending-limit protection to avoid blacklists — see the SMTP Service page. Email API Service for DevelopersThe Email API service for developers gives you a modern way to send email over HTTP: fast delivery, dynamic content, full error control, and built-in analytics, with token-based authentication and structured JSON responses that make retry logic straightforward. Email Analytics and Deliverability ToolsUniOne includes built-in tools for tracking delivery and analyzing performance: open and click tracking, bounce tracking, unsubscribe management, spam complaint reports from supported ISPs, and tagging/metadata for custom reports — all available from the dashboard. Pair these with the SPF and DMARC fundamentals if you’re still seeing inbox placement issues. FAQWhat is the easiest way to send email from Node.js?Install Nodemailer, create a transporter with your provider’s SMTP host and credentials, and call sendMail() — roughly fifteen lines from empty folder to delivered message. If your project already uses fetch and you want delivery tracking without extra dependencies, a single POST to an email API like UniOne’s is just as quick. Is Nodemailer better than using an API?Neither is universally better — they solve different problems. Nodemailer sends over SMTP, connecting directly to a mail server; it’s reliable and well understood, and it’s the right choice if you already have SMTP infrastructure or are integrating into a system built around it. An email API sends a JSON payload over HTTPS instead, and wins on speed, delivery tracking, analytics, and template-based messaging, especially at high volume. Many teams use SMTP in staging and an API in production. What’s the best way to send email attachments in Node.js?Nodemailer’s attachments array accepts a file path, a Buffer, or base64 content; UniOne’s API accepts base64-encoded objects with a type and name. Avoid files above 10MB encoded, never send executables or password-protected archives, and prefer a cloud-storage link for anything large — bulk campaigns with attachments are especially slow, since every recipient generates a fresh copy of the file. Do I need a domain to send email in production?Yes. Buy a domain, add SPF, DKIM, and DMARC DNS records, verify it with your provider, and use a consistent “from” address. Sending production email from a free Gmail or Yahoo address isn’t supported by most professional email services and will hurt deliverability. Can I send emails from localhost in Node.js?Yes — useful for initial testing only. Point Nodemailer at a local fake SMTP server such as MailDev or MailHog (both listen on localhost:1025), or use UniOne’s Email Testing environment to test against real infrastructure without delivering to real inboxes.  Learn how email marketing for jewelers can help you attract buyers, recover abandoned carts, build loyalty, and grow your jewelry business with every send.   Want to share links with friends, family or colleagues by email? Our guide will help you discover the right way of sending links by email.   When sending emails to contacts, you may sometimes receive spam complaints. These complaints can harm your sender reputation and put your customer relations in danger.    |