
 20 november 2026, 16:44

If you’re building a SaaS application or a website using Cursor or another AI agent, you might want users to receive welcome emails, verification codes, and account notifications.
Integrating email manually usually involves switching between your code editor, API documentation, email service dashboard, and testing tools.
But what if the process could be easier, with your AI assistant handling most of the setup and testing?
With UniOne’s hosted MCP server, you can connect AI tools like Cursor, Claude Code, and Codex to email infrastructure and use natural-language prompts to send test emails, create templates, configure domains, and investigate delivery issues.
In this guide, you’ll learn how to send email with MCP, connect UniOne to Cursor, send your first test message, and prepare your email integration for production.
What Is an Email MCP Server?
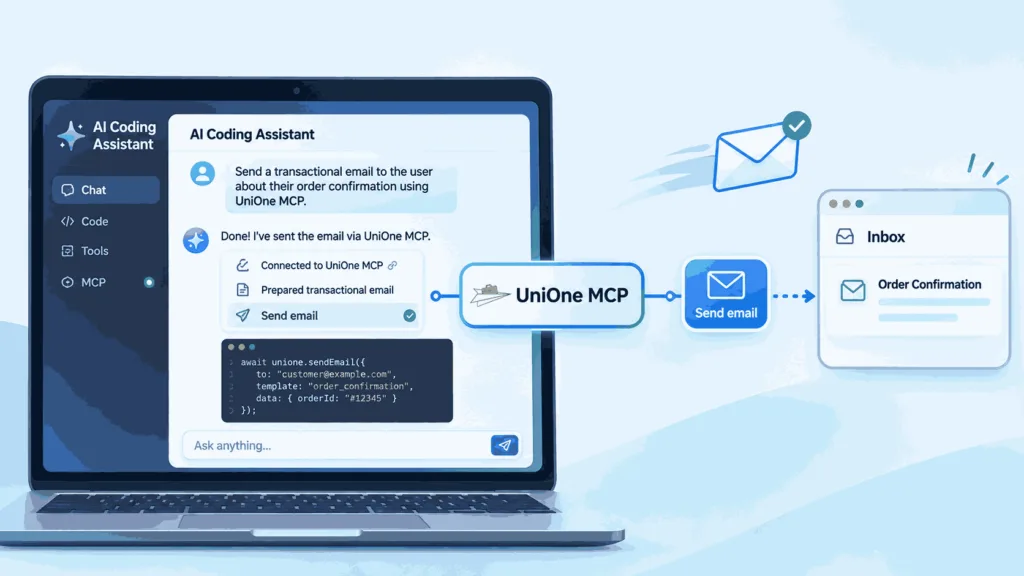
An email MCP server connects various AI assistants to email services, allowing them to perform actions, not just generate instructions or code.
MCP stands for Model Context Protocol, an open standard that lets AI applications communicate with external tools.
Without MCP, you might ask an AI assistant to write code for sending emails. The assistant generates the code, but you still need to configure credentials, execute requests, and verify the results.
With MCP, your assistant can use the email provider’s tools directly.
For example, you can ask it to:
- Send a test welcome email;
- Create a reusable transactional email template;
- Help configure and verify a sending domain;
- Check whether an email address is suppressed;
- Retrieve available email delivery events.
How Does UniOne MCP Work?
UniOne offers a hosted email MCP server at:
It connects compatible AI clients to UniOne’s email infrastructure through Streamable HTTP.
The basic workflow looks like this:
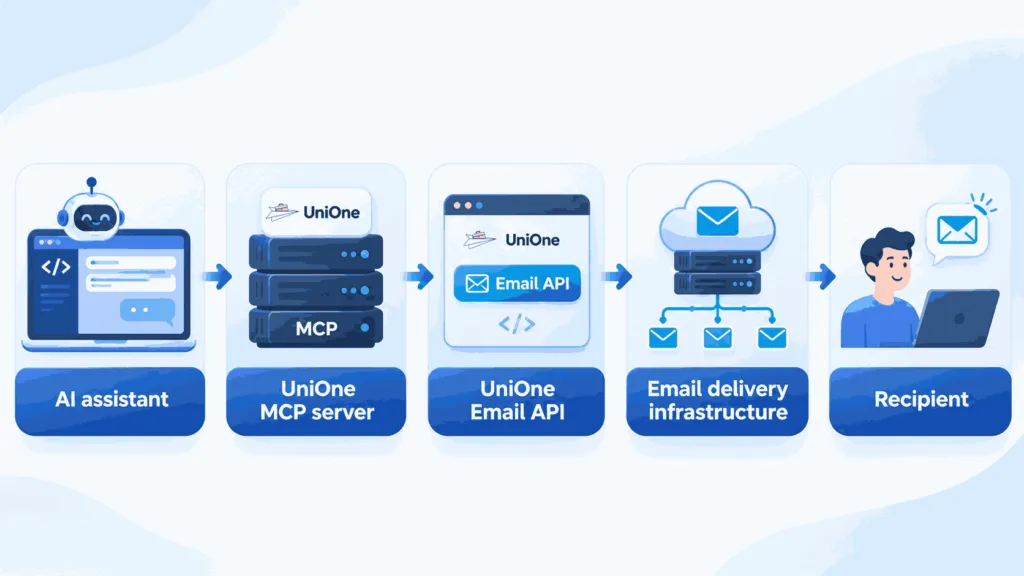
UniOne’s MCP server exposes tools for sending emails, managing templates, configuring domains and webhooks, checking suppression lists, and accessing delivery-related information.
You don’t need to build or host an MCP server yourself.
MCP also doesn’t replace UniOne’s Web API or SMTP. It provides a convenient interface for AI-assisted setup, testing, and management.
For a complete overview of the available features, see the UniOne MCP documentation.
Why Use MCP for Email Workflows?
For developers building SaaS products, AI applications, or internal tools, MCP can reduce manual work during email integration.
Faster setup. Instead of tedious switching between documentation and the email dashboard, you can ask your assistant to help configure domains, prepare templates, and test your setup.
Easier troubleshooting. When a test email doesn’t arrive, your assistant can retrieve suppression and delivery information and help identify possible causes.
Less context switching. You can manage several email-related tasks without leaving your AI development environment.
More accessible experimentation. UniOne’s sandbox lets you send real test emails to confirmed recipients without configuring your own domain.
A startup developer can connect UniOne to Cursor or other compatible AI assistant, test a welcome email, turn it into a reusable template, and then integrate production emailing into the application backend.
Let’s walk through this process.
What You Need Before You Start
To follow this tutorial, please prepare:
- A UniOne account. You can create one here.
- Cursor installed on your computer. We’ll use it for the main walkthrough.
- A test email address. Use an inbox you control.
- A browser. You’ll need it for UniOne account authorization.
For this initial setup, you won’t need your own sending domain, DNS records, or a separate MCP server installation.
We’ll use OAuth sign-in, so you don’t need to paste an API key into the Cursor configuration.
Important: Signing in gives the client access to your whole UniOne account. To limit an agent to one project, connect with that project’s API key instead (check if the Projects feature is enabled for your account first). Also, note that the sandbox doesn’t work with project keys, so if limited to the specific project access, your agent will only be able to send emails from the sending domains confirmed for that project.
How to Connect UniOne MCP to Cursor
Step 1. Add UniOne to Cursor
Open Cursor and locate its MCP configuration file.
For a global configuration, available across all of your projects, use:
~/.cursor/mcp.json
For a project-specific configuration, use:
.cursor/mcp.json
Add the following JSON:
{
“mcpServers”: {
“unione”: {
“url”: “https://mcp.unione.io/mcp”
}
}
}
Save the file.
If you’re already using other MCP servers, add UniOne to the existing mcpServers object rather than replacing the entire configuration.
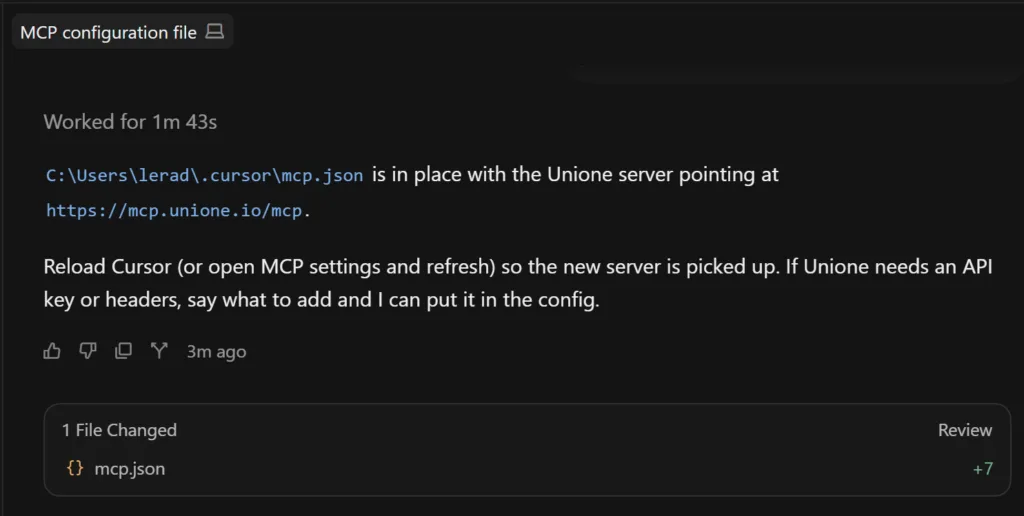
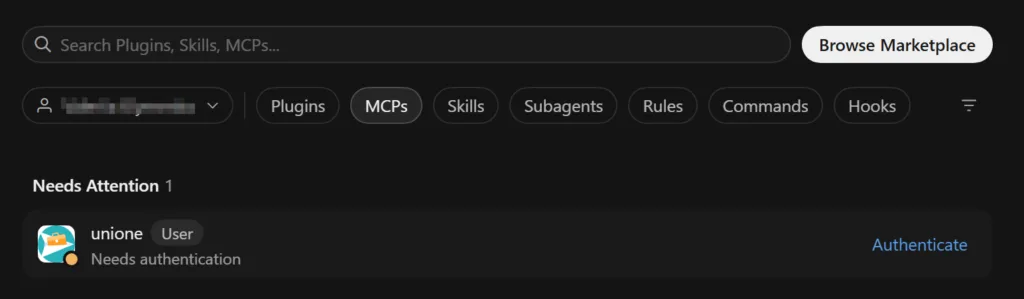
Next, open Cursor Settings – MCP.
Find the unione server, enable it if necessary, and click Connect.
Cursor will initiate authorization through your browser.
Step 2. Authorize UniOne Access
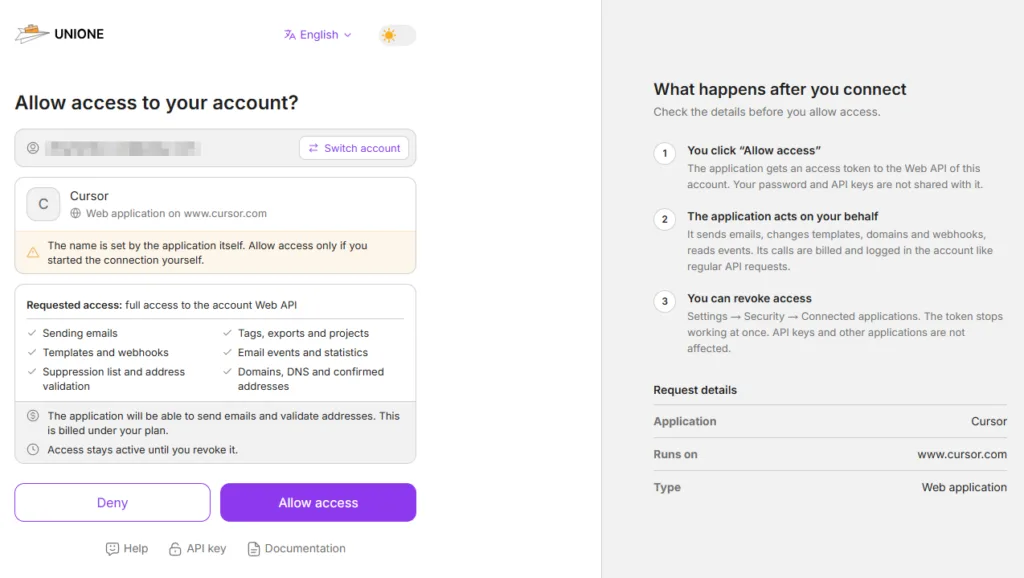
When the browser opens the UniOne authorization page, sign in to your account as prompted.
Review the consent screen carefully. It should identify the application requesting access and the permissions involved.
If you recognize the connection you initiated, click Allow access.
After authorization, return to Cursor.
The UniOne MCP server should now be available to your assistant.
You can later revoke OAuth access through UniOne Account → Security → Connected applications.
Step 3. Verify the MCP Connection
Before sending an email, confirm that Cursor can communicate with UniOne.
Open Cursor’s agent chat and enter the following prompt.
Example prompt:
Check my UniOne account. Show me which account or project is connected. Don’t change any settings.
The assistant should call UniOne’s get_account tool and return the available account or project information.
This is a read-only operation, making it a useful way to check the connection without changing or sending anything.
If the connection fails, return to Cursor’s MCP settings and check whether the server is enabled and authorization is complete.
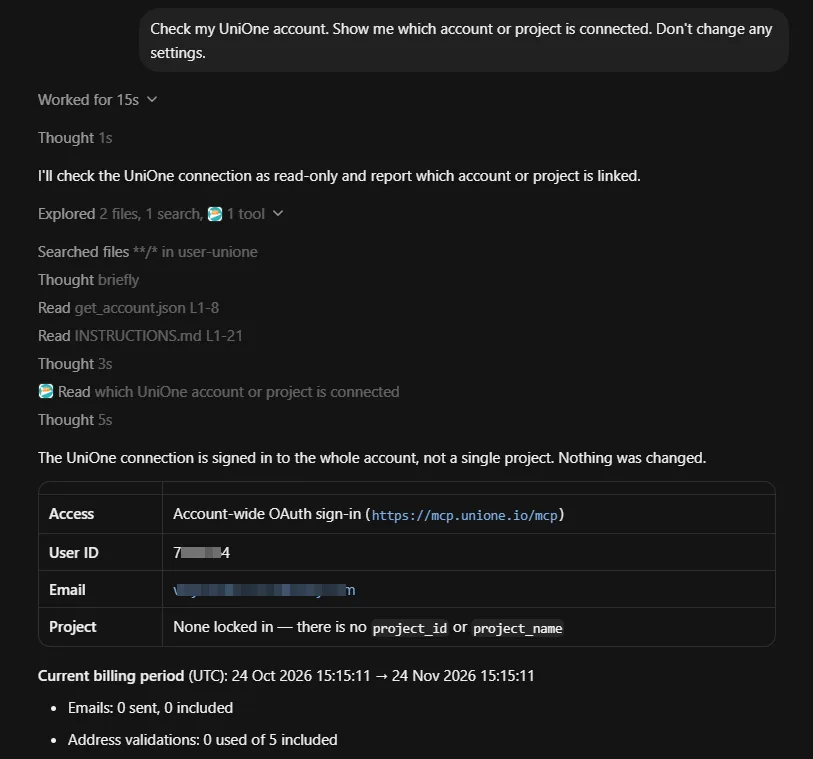
Last tested in November 2026, Cursor version 3.30.14, Windows 11 OS
For the complete configuration reference, see Connecting Cursor to UniOne MCP.
Send Your First Test Email with UniOne MCP
Now that Cursor is connected, let’s use UniOne’s sandbox to send a welcome email.
The sandbox provides a preconfigured sending domain with SPF and DKIM already set up, so you can test real email delivery without modifying your own domain’s DNS.
Step 4. Prepare a Welcome Email
Enter this prompt in Cursor:
Using the UniOne sandbox domain, prepare a test welcome email to [email protected].
Subject: Welcome to Example App
Body: Hi! Your email notifications are now working.
If the recipient isn’t confirmed yet, help me complete confirmation first. Ask for approval before sending.
Replace [email protected] with an inbox you control.
The assistant will use UniOne’s sandbox tools to obtain the sandbox domain and check the recipient’s confirmation status.
Step 5. Confirm Your Test Recipient
UniOne allows sandbox sending only to confirmed recipients.
If your address hasn’t been confirmed yet, the assistant can initiate confirmation using the add_confirmed_email tool.
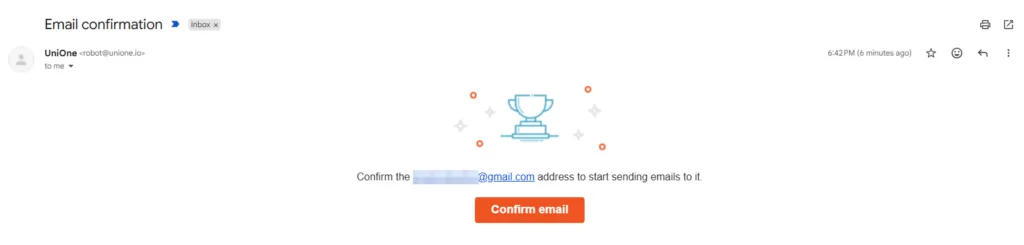
UniOne sends a verification message to your inbox.
Open that message and click the confirmation link.
The link is single-use and expires after 48 hours.
After confirmation, return to Cursor and enter:
I’ve confirmed my test address. Please send the welcome email using the UniOne sandbox domain. Show me the result and job_id.
The sandbox currently supports:
- Up to 10 confirmed recipient addresses.
- Up to 100 emails per day.
- A sandbox domain that expires after 31 days.
It works with account-level OAuth or an account API key, but not a project API key.
For current sandbox terms and conditions, refer to the UniOne MCP sandbox instructions.
Step 6. Approve the Sending Operation
Before sending, review the email details presented by your assistant.
UniOne classifies send_email as a destructive MCP operation because a sent email cannot be recalled.
Compatible MCP clients can use this classification to request approval. The exact approval behavior depends on the client’s security settings, so please review those settings before enabling any automatic tool execution.
Once the action is approved, the assistant invokes the sending tool.
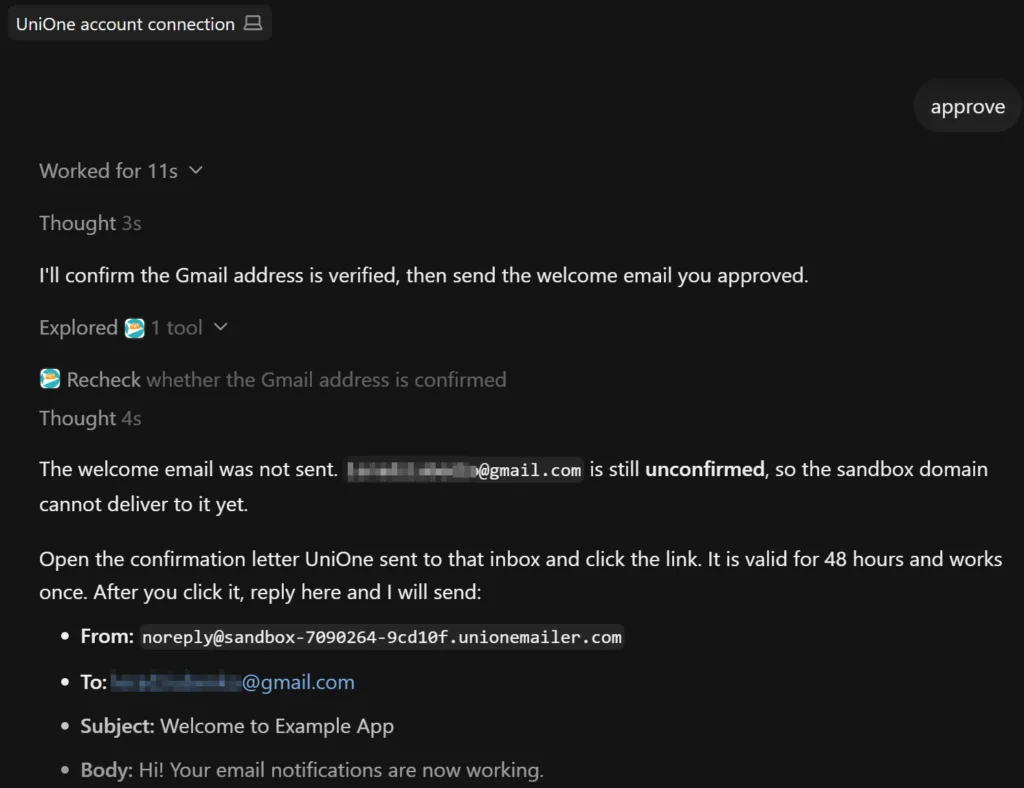
Last tested in November 2026, Cursor version 3.30.14, Windows 11 OS
Step 7. Check the Sending Result
After a successful sending request, UniOne returns information that includes a job_id.
This identifier can help associate the request with further delivery information.
However, there’s an important consideration:
A successful request status means it was accepted or processed successfully. It doesn’t guarantee message delivery or Inbox placement. For actual delivery status, you’ll need to perform additional operations.
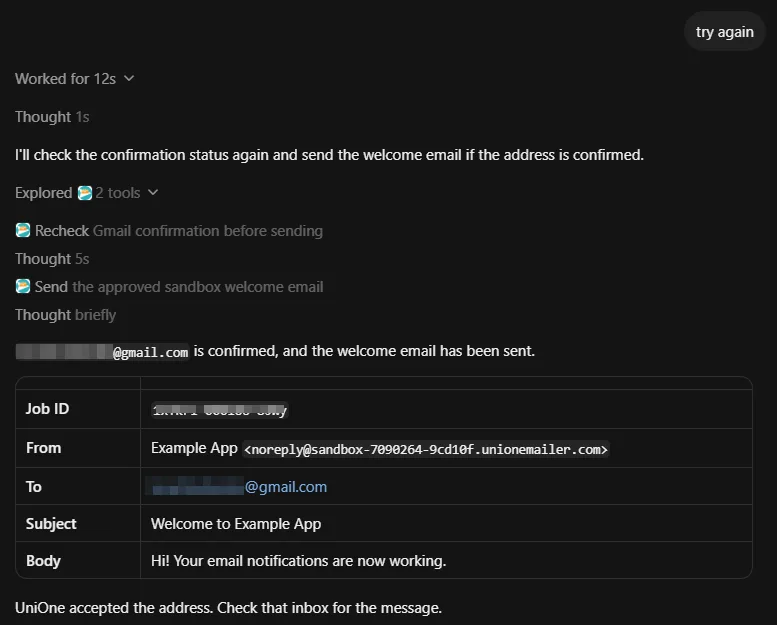
Last tested in November 2026, Cursor version 3.30.14, Windows 11 OS
Open your test mailbox and look for the welcome email.
Check whether the subject and content match the prompt.
If it hasn’t arrived, examine the available delivery events or suppression information before resending.
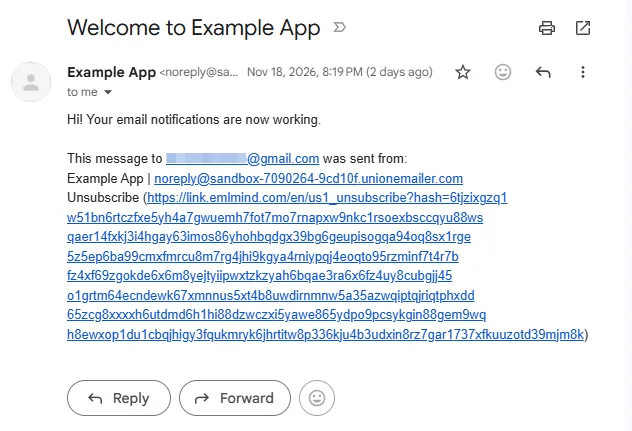
You’ve now completed your first email MCP workflow: connected an AI assistant, authorized UniOne, confirmed a sandbox recipient, sent a message, and checked the result.
Using UniOne MCP with Other AI Tools
Cursor is just one of many supported clients. UniOne’s hosted MCP server also works with Claude Code, Codex, VS Code, Claude, and other compatible tools.
Here are a few alternative connection methods.
| AI tool | How to connect |
| Claude Code | Run claude mcp add –transport http unione https://mcp.unione.io/mcp, then use /mcp to authenticate |
| OpenAI Codex | Run codex mcp add unione –url https://mcp.unione.io/mcp, followed by codex mcp login unione |
| VS Code / GitHub Copilot | Add UniOne to .vscode/mcp.json with type http and the hosted server URL |
| Claude Web/Desktop | Open Settings → Connectors → Add custom connector and enter the UniOne https://mcp.unione.io/mcp URL |
| ChatGPT | Use a custom MCP connector through Developer mode where supported by the account and workspace |
For VS Code, the configuration is:
{
“servers”: {
“unione”: {
“type”: “http”,
“url”: “https://mcp.unione.io/mcp”
}
}
}
All these integrations use the same hosted endpoint.
Some clients support browser-based OAuth, while others may require API-key authentication. ChatGPT custom connector availability depends on the plan and workspace settings.
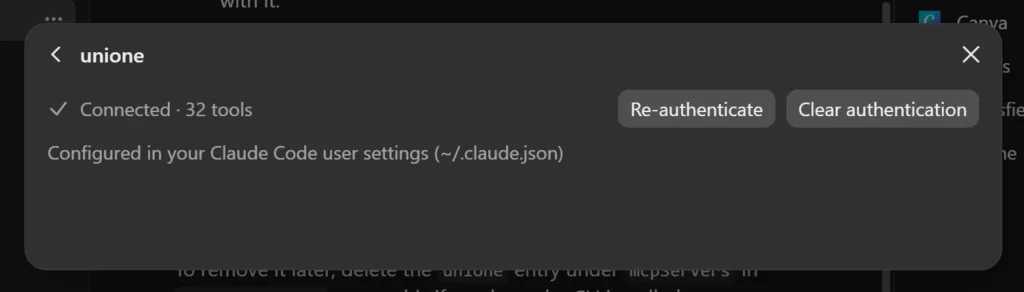
For detailed setup instructions and supported authentication options, see the UniOne MCP client configuration guide.
Practical Ways to Use UniOne MCP
Now that you’ve successfully sent your first email, let’s explore how MCP can help with the next stages of email integration.
Each example includes the prompt, required access, and expected outcome.
Common Email Tasks and Example MCP Prompts
| Task | Example prompt | Prerequisites | Expected result |
| Send a test email | “Send a welcome email to my confirmed test address.“ | Connected client, confirmed sandbox recipient | Sending result with a job_id |
| Create an email template | “Create a reusable welcome email template.“ | Template-management access | Saved template available for review |
| Verify a domain | “Check the DNS configuration of auth.example.com.“ | Domain and DNS access | Verification result or required corrections |
| Investigate a missing email | “Check why my test email wasn’t received.“ | Available suppression and event data | Diagnostic findings and recommended next steps |
| Configure a webhook | “Create a webhook for delivery failures.“ | Authorized HTTPS endpoint | Webhook configuration created or updated |
The tools available depend on your account permissions.
1. Turn Your Welcome Email into a Reusable Template
Sending a one-off test message is useful, but real applications typically need reusable email templates.
Let’s turn our welcome email into a template.
Example prompt:
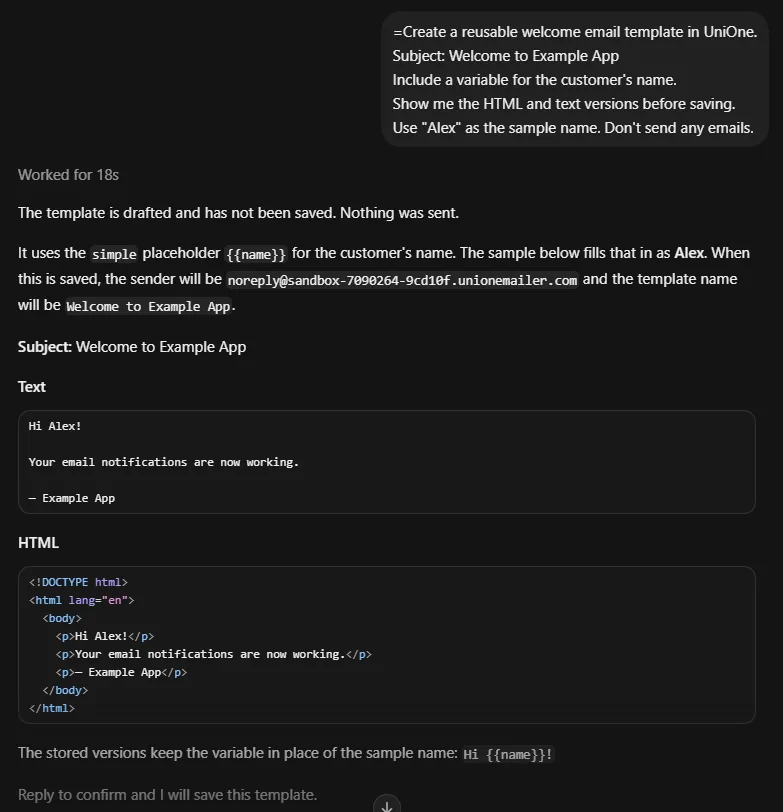
Create a reusable welcome email template in UniOne.
Subject: Welcome to Example App
Include a variable for the customer’s name.
Show me the HTML and text versions before saving.
Use “Alex” as the sample name. Don’t send any emails.
The assistant can prepare the content and then use UniOne’s set_template tool to save it after approval.
You can verify the template using get_template or by opening it in the UniOne dashboard.
For another example, ask the assistant to create an order confirmation template with the customer’s name, order number, and total.
Important: set_template can overwrite an existing template. Review the target template and content before approving the operation.
Last tested in November 2026, Cursor version 3.30.14, Windows 11 OS
2. Configure and Verify Your Sending Domain
Once your welcome email template is ready, the next step toward production is configuring your sending domain.
Suppose your application uses auth.example.com for authentication and onboarding emails.
Ask your assistant:
Help me configure auth.example.com as a sending domain in UniOne. Show me the DNS records required for verification and DKIM. Explain what I need to add in my DNS provider’s dashboard.
UniOne’s get_dns_records tool can add the domain and return the required DNS records.
You’ll then need to add those records to your domain’s DNS configuration.
The UniOne MCP server itself cannot access your DNS provider. However, some other agent with a separate, authorized DNS integration may be able to make those changes.
After updating DNS, ask:
Check whether auth.example.com is verified in UniOne. If it isn’t, explain which records need to be corrected.
The assistant can use validate_domain to check the configuration.
DNS changes often become visible within 10–30 minutes, although they can sometimes take up to 48 hours to propagate across DNS servers worldwide.
See UniOne’s domain setup instructions for the current workflow details.
3. Investigate a Missing Welcome Email
Let’s now return to the test welcome email we sent earlier.
Imagine the sending request succeeded, but the message didn’t appear in your inbox.
Instead of sending another copy, ask your assistant:
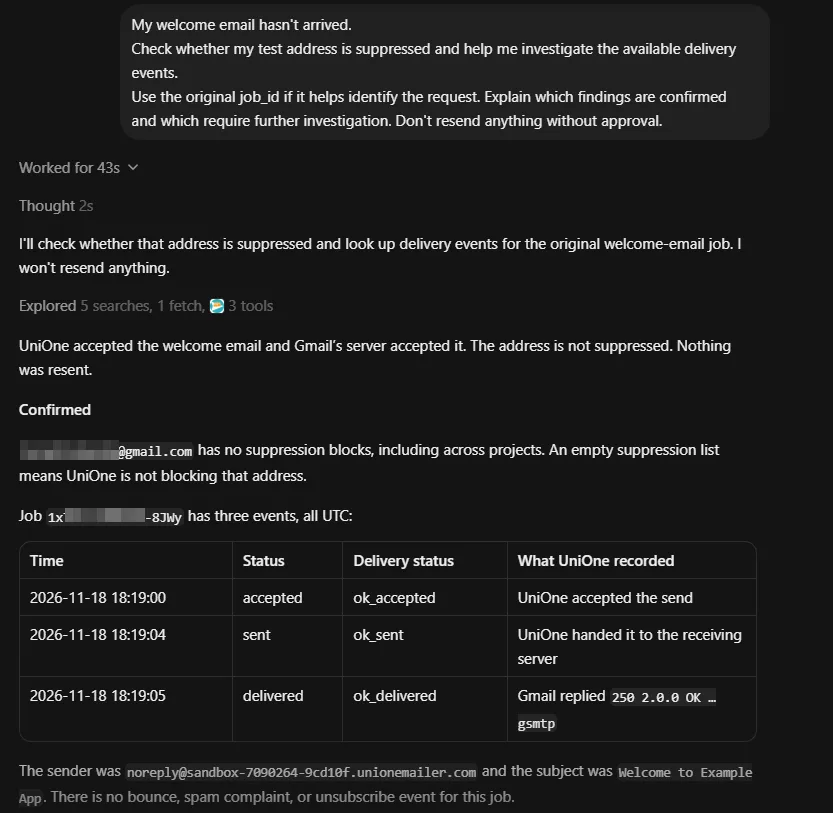
My welcome email hasn’t arrived.
Check whether my test address is suppressed and help me investigate the available delivery events.
Use the original job_id if it helps identify the request. Explain which findings are confirmed and which require further investigation. Don’t resend anything without approval.
Depending on account permissions and available records, the assistant can:
- Check recipient suppression information using get_suppression.
- Request delivery-event exports using request_event_dump.
- Retrieve export information using get_event_dump.
- Analyze available events if the AI client can access the exported file.
Possible explanations include recipient suppression, temporary delivery failures, rejected messages, or a delay after acceptance.
The assistant should distinguish confirmed delivery events from assumptions.
A job_id helps with investigation, but the MCP server doesn’t provide a universal, dedicated job-ID lookup tool.
Some export-analysis tasks may also require additional client capabilities.
Last tested in November 2026, Cursor version 3.30.14, Windows 11 OS
For available operations, consult the UniOne MCP tools reference.
Moving from Testing to Production
The sandbox helps you test email sending, but real customer communications require a few more steps.
Before going live:
- Verify your own sending domain.
- Confirm that your plan permits sending to your intended recipients.
- Check SPF, DKIM, and applicable domain authentication requirements.
- Configure delivery monitoring and webhooks as needed.
- Review your AI assistant’s account permissions.
- Implement application-triggered sending through UniOne’s Web API.
On UniOne’s Free plan, sending from your own domain is restricted to addresses on that domain or confirmed addresses. Customer-facing sending requires an eligible paid plan.
For production applications, UniOne recommends using the Web API directly from your backend.
MCP remains useful for configuring, testing, and troubleshooting the email infrastructure.
MCP vs Email API vs SMTP
| Method | Best suited for |
| MCP server | AI-assisted configuration, testing, templates, and troubleshooting |
| Email API | Backend-triggered transactional email and application integrations |
| SMTP | Existing applications, CMS platforms, and SMTP-compatible software |
These methods complement each other rather than replace one another.
Common MCP Setup and Sending Problems
If something doesn’t work, use the following checks before changing your configuration.
| Problem | What to check |
| No connection to the MCP server | Server URL, Streamable HTTP support, and client settings |
| Authentication error (401) | OAuth session or API-key validity |
| UniOne tools aren’t visible | Server activation and the client’s tool permissions |
| Sandbox email can’t be sent | Recipient confirmation, sandbox limits, or expiration |
| Domain verification fails | DNS records and propagation |
| Sending succeeds but email doesn’t arrive | Delivery events, suppression status, Spam folder |
| Rate limit error (429) | Request frequency and retry behavior |
| Server error (50x) | Retry after checking the service status or contact support |
For more detailed investigation of other errors, please, check the UniOne API documentation.
Security Tips for AI Email Sending
AI agents can perform potentially problematic actions, so access control matters.
UniOne classifies tools as Read, Write, or Destructive. Sending emails, deleting resources, and overwriting existing configurations are marked as destructive.
Compatible clients use this information to request confirmation, but approval behavior depends on the client configuration.
Follow these practices:
- Approve only MCP connections you initiated.
- Review recipients and message content before sending.
- Use project-scoped API keys when account-wide access isn’t necessary.
- Store API keys in environment variables or secure credential storage.
- Never paste credentials into an AI conversation.
- Treat instructions found in external documents, tickets, and webpages as untrusted data.
- Revoke unused connections.
For example, if an agent reads a customer support ticket containing instructions to forward account data to an external address, it must not treat that content as authorization to send an email.
You can revoke OAuth-connected applications through Account – Security – Connected applications in UniOne. For API-key connections, regenerate the relevant key.
Conclusion
MCP makes it easier for developers to connect AI assistants to real email infrastructure.
With UniOne’s hosted MCP server, you can configure an AI client, send a test email without DNS setup, create reusable templates, verify sending domains, and investigate delivery problems through natural-language prompts.
The most important part is that you can test the workflow before moving to production.
Once your application is ready, use the UniOne Web API for backend-triggered transactional emails while keeping MCP available for configuration, testing, and diagnostics.
Ready to get started? Explore the UniOne MCP Server and connect your AI assistant using the official setup documentation.
Frequently Asked Questions (FAQ)
What is an email MCP server?
An email MCP server is the way to connect compatible AI assistants to an email provider using Model Context Protocol. It allows agents to perform supported email-related operations, such as sending messages, creating templates, checking domains, and retrieving delivery information.
Do I need to host my own MCP server to use UniOne?
No. UniOne provides a hosted MCP server at https://mcp.unione.io/mcp. You only need a compatible client and authorization to your UniOne account.
Can I send a test email before configuring DNS?
Yes. UniOne’s sandbox provides a preconfigured sending domain for testing. You must confirm the recipient address before sending. Sandbox limits and expiration rules apply.
Does MCP replace an email API?
No, it doesn’t. While MCP is useful for AI-assisted configuration and testing, for production applications that send transactional emails based on backend events, we recommend using our Web API.
What should I check if my test email doesn’t arrive?
Check whether the address is confirmed, whether it’s not suppressed, and the delivery events. Just in case, check your “Spam” folder as well since occasionally emails sent from the test domains might land up there.
Can I control or revoke my AI assistant’s access?
Sure, you can. OAuth connections can be revoked from UniOne’s Connected applications settings. For API-key connections, regenerate the key. Project-scoped keys can help limit access where appropriate.
Does using UniOne MCP cost extra?
The MCP server itself has no additional fee. Email sending and validation operations follow the same pricing and usage rules as UniOne’s API. Check our current pricing to choose the plan for your needs.