
 26 june 2026, 08:38
Most apps need to send email at some point — a welcome note when someone signs up, a receipt after a purchase, a password reset when a user gets locked out. If your backend already lives in Google’s Firebase, you don’t need a separate mail server to handle any of that. A Firebase Cloud Function can do the sending for you, and pairing it with Nodemailer turns a few lines of JavaScript into a reliable email pipeline.
This guide walks through the whole thing from start to finish. We’ll look at the different ways to send mail from Firebase and learn when each one makes sense. Then we set up Cloud Functions, wire Nodemailer to an SMTP service, send a first email from an HTTP endpoint, and finally make emails fire automatically when something happens in your database. By the end you’ll have a working function you can deploy and build on.
What a Firebase Cloud Function is, and why it suits email
A Cloud Function is a small piece of backend code that Firebase runs for you on demand. There’s no server to provision and nothing to keep running between requests — the function spins up only when it’s needed, does its job, and shuts down. It can be triggered in different ways: by an HTTP request, by a change in your Firestore database, by a new user signing up, or by a file landing in Cloud Storage.
That event-driven model is exactly what email wants to be. An order confirmation should go out the moment an order is written to the database; a welcome message should follow a sign-up without you wiring up any client-side code. Because Firebase scales the computing power automatically as traffic rises and falls, you also sidestep the usual headaches of running mail infrastructure yourself — connection pooling, retries, server maintenance. You write the logic for one email, and Firebase handles running it a thousand times, even in parallel.
It helps to know the events you can hook into, because they shape how you wire up sending. An HTTP trigger fires when an URL is called, which suits contact forms and manual sends. A Firestore trigger invokes when a document is created, updated, or deleted — ideal for confirmations and notifications tied to your data. There are also triggers for Firebase Authentication and Cloud Storage, so a sign-up or a file upload can set off an email of its own. We’ll use the HTTP and Firestore triggers below, since these two cover the majority of real cases.
Choosing how to send: SMTP, a cloud API, or the Firebase extension
Before any code, it helps to know your options, because Firebase gives you three reasonable paths to the inbox. They differ in how much control you get and how much setup they ask for.
| Method | How it works | Best for | Trade-off |
|---|---|---|---|
| SMTP with Nodemailer | Your code connects to an SMTP server (such as UniOne’s) and hands off the message | Full control, works with any provider, quick to set up | You manage the transporter and credentials yourself |
| Cloud email API | Your function makes HTTPS calls to an email provider’s REST API | High volume, server-side templates, analytics | A provider-specific API to learn, and some lock-in |
| Firebase Trigger Email extension | A write to a Firestore collection automatically sends a message | A no-code path for simple cases | Least control, and still needs an SMTP provider behind it |
For most projects the SMTP route is the sweet spot. It’s the most flexible, it works with whatever email service you already trust, and Nodemailer makes the code short and readable. That’s the path we’ll follow here, using UniOne’s SMTP service as the example provider. If you later outgrow SMTP — say you’ll end up sending large volumes and want detailed delivery data — then moving to an email API will be a natural next step, and the same UniOne account covers both.
The Trigger Email extension deserves a mention for the simplest cases: if all you want is to fire a message when a document lands in a collection, installing it can save you writing any function at all. The catch is that you hand over control of the logic and still have to supply an SMTP provider credentials, so the moment you need a condition, a custom format, or anything out of the ordinary, you end up writing code anyway.
Before you start
A few pieces need to be in place. None of them take long:
- Node.js must be installed locally, since the Firebase CLI runs on it.
- A Firebase project on the Blaze (pay-as-you-go) plan. This matters: the free Spark plan blocks outbound connections to non-Google services, so your function can’t reach an external SMTP server until you upgrade. Blaze has a generous free tier, so light usage usually costs nothing.
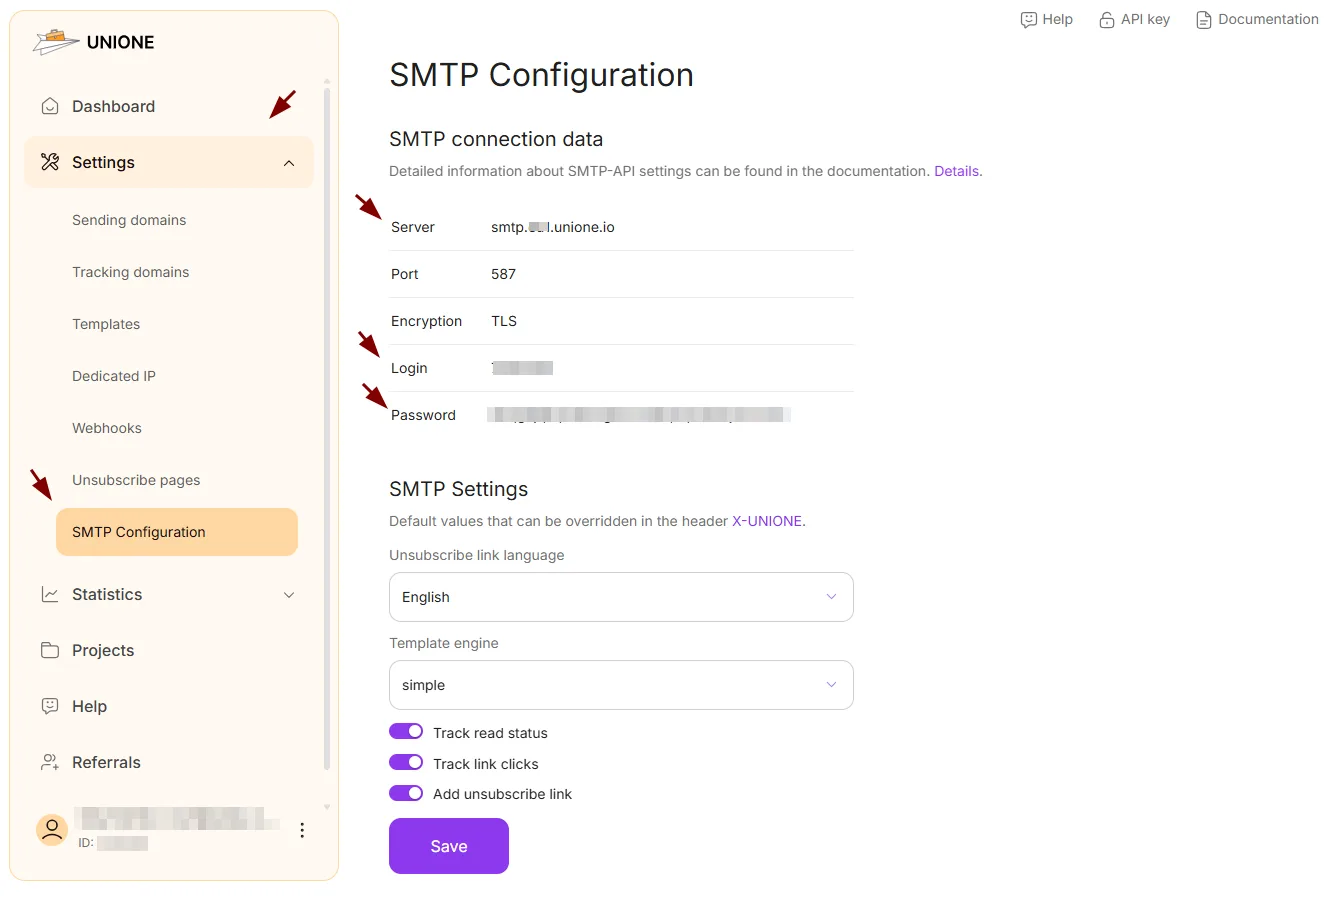
- An SMTP account with an email provider. We’ll use UniOne — you can sign up free and grab your credentials from the dashboard.
- The Firebase CLI, which you’ll install in the first step.
Step 1: Set up Firebase Cloud Functions
The Firebase CLI is your main tool for building, testing, and deploying functions. Install it globally with npm, then sign in and initialize a functions project:
npm install -g firebase-tools
firebase login
firebase init functions
When the wizard asks, choose JavaScript and let it install dependencies. You’ll end up with a functions folder containing an index.js file — that’s where your code goes. Cd into that folder and add the packages we need: Nodemailer for sending, plus the Firebase Admin SDK and the Functions SDK.
cd functions
npm install nodemailer firebase-admin firebase-functions
Open functions/index.js and initialize the Admin SDK once at the top of the file, so the rest of your code can talk to Firebase services:
const admin = require("firebase-admin");
admin.initializeApp();
With the project scaffolded, the next step is teaching Nodemailer how to reach your email service.
Step 2: Configure Nodemailer with your SMTP service
Nodemailer is the most widely used email library for Node.js, and it slots straight into the Firebase runtime. Instead of you crafting raw SMTP commands or email headers, it gives you a clean object to fill in — who the message is from, who it’s going to, the subject, the body — and takes care of the rest. The piece that connects it to your provider is the transporter, which holds your SMTP host, port, and login.
One thing worth getting right from the start is where those credentials live. The old approach you’ll still see in many tutorials — functions.config() — has been deprecated by Firebase, so it’s not the right way to build something new. The current, supported method is to store sensitive values as secrets. Set yours once from the command line:
firebase functions:secrets:set SMTP_USER   # enter your UniOne user_id or project_id
firebase functions:secrets:set SMTP_PASS   # enter your UniOne API key
You then declare those secrets in your code with defineSecret and read them at runtime. Here’s the connection to UniOne’s SMTP server, which takes only the host, port, and your login:
const {defineSecret} = require("firebase-functions/params");
const nodemailer = require("nodemailer");

const SMTP_USER = defineSecret("SMTP_USER");
const SMTP_PASS = defineSecret("SMTP_PASS");

function createTransporter() {
  return nodemailer.createTransport({
    host: "smtp.us1.unione.io",   // or smtp.eu1.unione.io for EU accounts
    port: 465,                    // 465 uses TLS directly; use 587 for STARTTLS
    secure: true,                 // true for port 465, false for 587
    auth: {user: SMTP_USER.value(), pass: SMTP_PASS.value()},
  });
}
Because a secret’s value is only available while the function is running, we build the transporter inside a small helper function rather than at the top of the file. Each function that sends mail will call createTransporter() and declare which secrets it needs.
The two ports you’ll see are worth a sentence. Port 465 opens an encrypted connection from the very first byte, which is why secure is set to true; port 587 starts in the clear and upgrades to encryption with STARTTLS, so there you’d set secure to false. Either works with UniOne, so pick whatever your environment allows — 465 is the simplest default. Keeping the login in secrets rather than inside the file means it never reaches your source control system, which is precisely where an SMTP password should never end up.
With that in place, we’re ready to actually send something.
Step 3: Send your first email from an HTTP function
The simplest way to see an email go out is an HTTP-triggered function — deploy it, and Firebase hands you an URL that sends a message every time it’s hit. It’s perfect for the first test and things like contact forms.
const {onRequest} = require("firebase-functions/v2/https");

exports.sendEmail = onRequest({secrets: [SMTP_USER, SMTP_PASS]}, async (req, res) => {
  const transporter = createTransporter();
  try {
    await transporter.sendMail({
      from: '"Your App" <[email protected]>',
      to: req.query.to || "[email protected]",
      subject: "Hello from Firebase",
      text: "This email was sent from a Firebase Cloud Function using Nodemailer.",
    });
    res.status(200).send("Email sent successfully");
  } catch (error) {
    console.error("Error sending email:", error);
    res.status(500).send("Something went wrong while sending the email");
  }
});
A couple of details are worth pausing on. The from address should be on a domain you’ve verified with your email provider — sending from a random Gmail address results in poor deliverability, while a verified [email protected] lands cleanly. The {secrets: […]} option is what gives this function access to the SMTP login you stored earlier.
Deploy it and try it out:
firebase deploy --only functionsFirebase prints the function’s URL when the deploy finishes. Open it in a browser with a recipient attached and the message goes out:
https://<region>-<project>.cloudfunctions.net/[email protected] 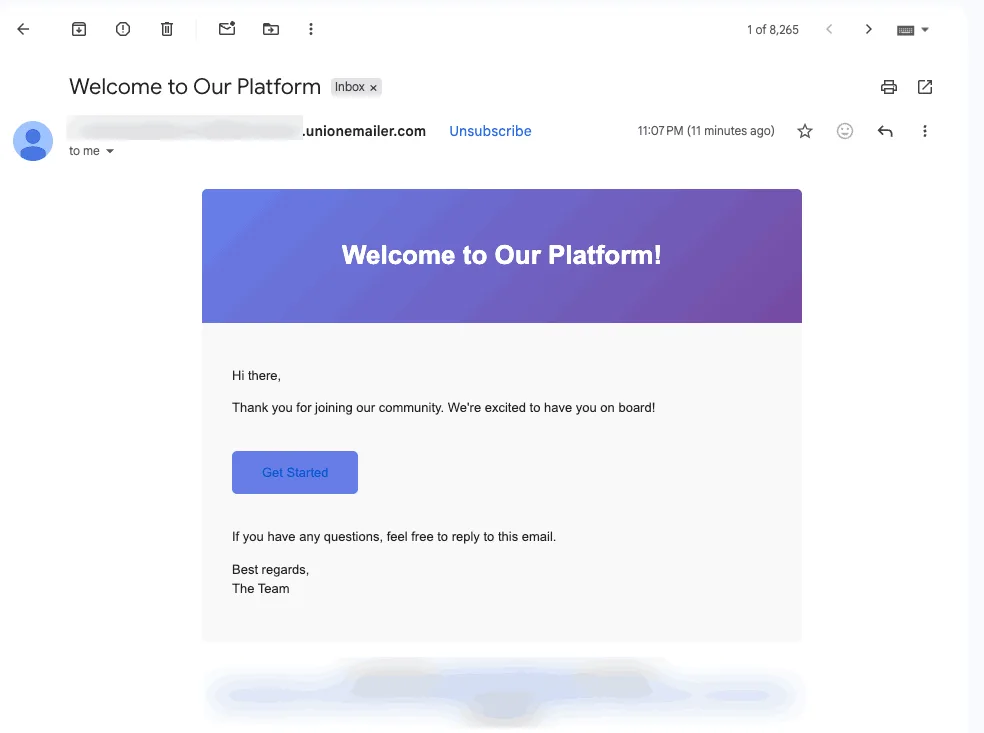
If the email arrives, the whole chain is working — Firebase executed your code, Nodemailer connected to UniOne, and the message reached the inbox. From here, it’s all refinement.
Step 4: Send a polished HTML email with attachments
Plain text is fine for a quick test, but real emails are usually in HTML, and sometimes they carry an attachment — a receipt, a ticket, a getting-started PDF. Nodemailer handles both with the same sendMail call; you just add an html field, and an attachments array if you need one.
It reads best if you keep the markup in a separate function and pass in the details that vary per user. A welcome email might look like this:
function welcomeTemplate(name, dashboardUrl) {
  return `
    <div style="font-family: Arial, sans-serif; max-width: 600px; margin: 0 auto;">
      <h1>Welcome, ${name}!</h1>
      <p>Thanks for joining. Your account is ready to go.</p>
      <p><a href="${dashboardUrl}">Open your dashboard</a></p>
    </div>
  `;
}

await transporter.sendMail({
  from: '"Your App" <[email protected]>',
  to: user.email,
  subject: "Welcome aboard",
  html: welcomeTemplate(user.name, "https://yourapp.com/dashboard"),
  attachments: [
    {filename: "getting-started.pdf", path: "./assets/getting-started.pdf"},
  ],
});
The attachments array accepts a path, a URL, or a buffer, so you can attach a static file or something you generate on the fly. If you’d rather not hand-write HTML for every message, UniOne’s transactional email templates give you responsive designs you can reuse and personalize instead.
Step 5: Send email automatically when something happens
The real payoff of running email inside Firebase is automation. Rather than calling an endpoint yourself, you let a function listen for an event and react. The cleanest version of this is a Firestore trigger: when a document is created in a collection, the function fires.
A common pattern is a welcome email that goes out the moment a new user document is written. With Functions v2 you use onDocumentCreated, and the event hands you the new document along with the path parameters:
const {onDocumentCreated} = require("firebase-functions/v2/firestore");

exports.sendWelcomeEmail = onDocumentCreated(
  {document: "users/{uid}", secrets: [SMTP_USER, SMTP_PASS]},
  async (event) => {
    const user = event.data.data();        // the newly created user document
    const transporter = createTransporter();

    await transporter.sendMail({
      from: '"Your App" <[email protected]>',
      to: user.email,
      subject: "Welcome to our platform",
      html: welcomeTemplate(user.displayName || "there", "https://yourapp.com/dashboard"),
    });

    console.log("Welcome email sent to:", user.email);
  }
);
Now any time your app creates a users/{uid} document, the recipient gets a personalized welcome without a single extra line on the client. The same idea covers most transactional needs: trigger on a new orders/{orderId} document for confirmations, or on a status change for shipping updates. If you’d prefer to react to the Firebase Authentication sign-up event directly, instead of a Firestore write, that’s possible too — through a v1 auth trigger or v2 blocking functions — but driving emails off your own database documents keeps the logic simple and provider-agnostic.
From here the pattern generalizes to almost any transactional email you can name. A new document in an orders collection sends a receipt; an update that flips an order to shipped sends a tracking note; a write to a password_resets collection sends a reset link. Because each function cares about only one event, they stay small and easy to work with, and you can add new ones without disturbing the rest. The database becomes your source of truth, and email simply follows it.
Testing locally and deploying to production
You don’t have to deploy every time you change a line. The Firebase Emulator Suite runs your functions on your own machine so you can iterate quickly:
firebase emulators:start --only functionsFor functions that send real mail during testing, point them at a test inbox or a sandbox rather than live recipients, so a typo never reaches a customer. When everything behaves, ship it with the same command from before:
firebase deploy --only functionsDeploys are incremental, so only the functions you’ve changed are updated.
Keeping your email functions safe
An open HTTP endpoint that sends email is an invitation for abuse, so a little hardening goes a long way. Two habits cover most of the risk. The first is validating input before you send anything — check that the recipient is a real address, that the subject and body are within sane limits, and that the content isn’t trying to smuggle in a script:
function validateEmailInput({to, subject, message}) {
  const emailPattern = /^[^\s@]+@[^\s@]+\.[^\s@]+$/;
  if (!to || !emailPattern.test(to)) return "Invalid recipient address";
  if (!subject || subject.length > 200) return "Subject must be 1–200 characters";
  if (!message || message.length > 5000) return "Message is too long";
  return null;   // null means the input is valid
}
The second habit is rate limiting, so no single caller can hammer your function into a huge bill or a spam complaint. You can cap requests per IP with a library like express-rate-limit wrapped around your endpoint, or gate the function behind Firebase Authentication so only signed-in users can call it. Validating addresses up front with an email validation tool also keeps bad data out.
Keeping an eye on delivery
Once emails are taking off, you’ll want to know how they’re landing. Two views help. Firebase’s own logs — visible in the console or with firebase functions:log — show you whether the function ran and surface any errors it threw. For what happens to the message after it leaves your code, your email provider’s dashboard is the place to look; in UniOne, the Statistics → Delivery report shows delivered, bounced, and failed messages so you can spot a problem before your users do.
If you’d rather have that delivery data inside your own systems than in a dashboard, most providers — UniOne included — can push events like deliveries, opens, and bounces via a webhook, which you can receive with yet another small Firebase function. That closes the loop nicely: Firebase sends the mail, and Firebase hears back about what became of it.
A note on cost and cold starts
Two practical things are worth knowing before you ship. The first is cost. Outbound email needs the Blaze plan, but Blaze bills only for what you use and includes a free monthly allotment, so a typical transactional workload of a few thousand emails a month often stays inside it. You pay for function invocations and compute time, not for the emails themselves — that part of the bill comes from your email provider.
Another thing to keep in mind is cold starts. When a function hasn’t run in a while, Firebase spins up a fresh instance to handle the next call, and that adds a second or two to the first send. For transactional email this is rarely an issue, since nobody is watching the function run. But if you ever need that very first message to go out the instant it’s triggered, you can keep an instance warm with a minimum-instances setting. For everything else, the default behavior is exactly what you want.
When a Firebase Function isn’t the right tool
Firebase Functions and Nodemailer are a great fit for transactional email — the welcome notes, receipts, and alerts that go out one at a time in response to events. They’re a poor fit for large marketing blasts. Sending thousands of promotional messages at once leans on the function execution model in a way that gets expensive fast, and you lose the campaign features — segmentation, scheduling, unsubscribe handling — that a marketing platform gives you. For that kind of volume, hand the sending to a dedicated service through its API and let Firebase trigger it, rather than doing the heavy lifting in a function.
Bringing it together
Firebase Cloud Functions and Nodemailer give you a clean, serverless way to send email without standing up or babysitting a mail server. You’ve seen the full arc here: choosing a sending method, configuring Nodemailer with a real SMTP service, sending from an HTTP endpoint, dressing the message up with HTML and attachments, and finally letting a database event trigger the send on its own — with testing, security, and monitoring along the way. It’s enough to cover welcome emails, password resets, order confirmations, and most of what a growing app needs.
UniOne pairs naturally with this setup. Its SMTP service is what we connected Nodemailer to here, and when you’re ready for higher volume or richer data, its email API plugs into the same Firebase functions just as easily. If you’re wiring email into other parts of your stack, the same ideas carry over to our guides on sending email with Node.js and Python.